Terrace Construction & Finishing Guide
How to Install Hardwood Terraces With Invisible Fixings
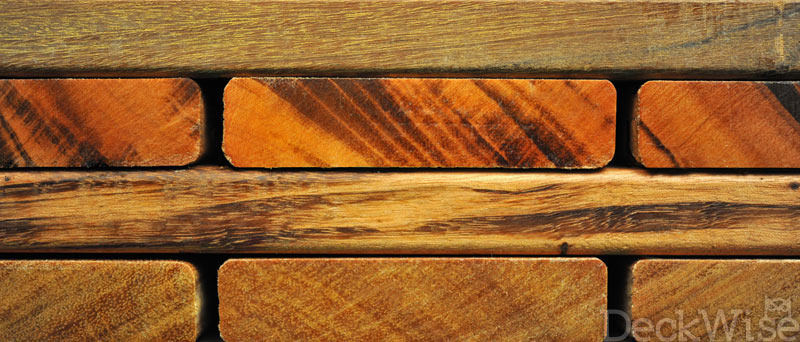
Ipe and many other hardwoods are incredibly dense. To achieve top-quality results, the use of a few technical grade tools may be needed. The suggestions on this page function as an outline for building and installation directives that will assist you in obtaining the best results possible.
Prior to Starting Your Project
Prior to beginning construction, it is always important that you inform yourself of local building regulations and codes as well as to meet with an architect. It is critical that you adhere to all building codes in your area. There are many factors installers face on the job and it is your responsibility to ensure the building materials being considered are viable for installation. For any individual or specific product being used on a job, be sure to understand all manufacturers installation guidelines. If any information provided by DeckWise® International B.V. contradicts your local building codes or manufacturing instructions, please contact us for an explanation prior to beginning construction.
Hardwood Terrace Applications
For exterior use, hardwood terrace planks are mostly air dried. Air dried Ipe timber is highly suitable for a variety of outdoor applications. This includes, but is not limited to: terraces, cladding, seating, outdoor furniture, docks, stairs, planter boxes, and many more uses.
Handling and Storing Hardwood Planks
It is very important that hardwood timber planks are allowed to rest in their final installation location for around 7 days prior to construction. This allows the timber planks to become acclimated to the local climate, moisture levels and temperature they will be residing in. Hardwood planks should never be stored directly on the ground or directly on a concrete surface. We advise that you DO NOT store your terrace planks for any longer than 30 days prior to construction without first speaking with your timber store representative. They will let you know if your storage procedures are recommended and if it will not harm your final build.
When storing and acclimating your timber planks, it is key that they remain at least 31cm above the ground. To be sure your building materials are being properly ventilated, rest the planks on timber blocks. It is important that you DO NOT cover your planks with a tarp or plastic during the acclimation period. Doing so could lead to stability and moisture retention issues. However, we do recommend that you cover the top of your planks with a sheet of plywood to help protect them from rain water. Be sure to always keep timber dry prior to installation and that it is stacked using shims in between layers.
NEVER STORE HARDWOODS IN AN ENCLOSED AREA!
Plank Spacing & Pitch
Terrace Plank Gap Spacing
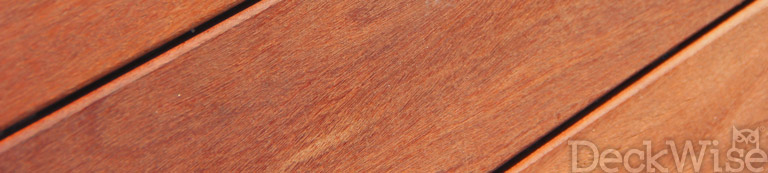
Wherever Ipe terrace planks are being installed, the average space to leave between the timber planks is 2,4mm. The EXTREME® fixing (2,4mm gap) ensures that the planks are free to expand and contract without negative consequences. It also permits proper air flow and ventilation. On average, plank shrinkage is typically 3,2mm on 102mm wide planks and 6,4mm on 152mm planks. Depending on the residing climate and intended use, timber shrinkage will vary.
Composite terrace planks expand on their length, not width. Use our Extreme S® or EXTREMEKD® invisible fixing clips for composite planks. Always drive the stainless steel screw straight down 90 degrees through the clip and into the sleeper joist below.
Terrace Plank Pitch
To allow for proper water runoff and drainage, be sure that the terrace substructure framing is pitched away from the house or building. We advise a minimum pitch of 3,2mm per 30m for proper drainage. (When installing Tongue and Groove flooring planks, a much more aggressive pitch is recommended.)
Terrace framing timbers should be installed with their crown facing up to help water drain off the terrace surface. Framing timber may possibly have a crown up to 38mm or greater. This could accelerate the opportunity for standing water puddles. Evaporation from standing water under a terrace can lead to cupping or twisting of the timber planks.
Installing a hardwood terrace directly above a concrete foundation is NOT recommended. Due to moisture retention, hardwoods should never be installed directly on top of concrete slabs. When terrace planks must be installed directly over new or aged concrete, always elevate the terrace framing properly in accordance to your local building codes. Proper air flow is critical for a long lasting terrace.
Important Considerations
Proper Ventilation
The design of your terrace must permit adequate cross ventilation (air flow) below the surface. Proper air flow will assure stability, prevent cupping and surface checking, as well as reduce the natural movement of the timber. We advise at least 46cm of open space below the joists. We also suggest allowing open sides around the perimeter. If skirting must be installed along the perimeter of a terrace, it is very important that the skirting does not prohibit cross ventilation. Always ensure the surface ground is adequately sloped below to eliminate any problems associated with water runoff.
Drilling & Cutting Hardwoods
Because Ipe and imported hardwoods are a very dense timber by nature, high quality carbide tipped saw blades are often recommend for proper cutting. Carbide tipped drill bits (or brad point drill bits) provide a smooth and clean hole while pre-drilling screw pilot holes for invisible terrace fixings.
Seal End Grains
It is important that fresh timber end cuts are sealed within the first 24 hours of sawing. We recommend a high quality end grain wax is applied with a paint brush. It will dry clear on end grain cuts. NEVER apply end grain sealant on the walking surface of a terrace, it is for end cuts only. Any sealant that touches or drips onto a hardwood surface should be cleaned off immediately before drying occurs. Sanding may be needed to completely clean the surface.
Fixings & Finishing
Installing & Securing Hardwood Planks
When securing exotic hardwood terrace planks, always use a high quality stainless steel screw. Using a timber screw that is anything less than 305 grade stainless steel might lead to unwanted blemishes and discoloration on the plank around the fixing and screw. Even worse, by not using high quality stainless steel it can lead to the screw breaking under pressure from timber movement.
While installing hardwood terrace planks, it is always important to pre-drill all fixing clip holes with a properly sized drill bit. Pre-drilling helps prevent timber planks from splitting when installing terrace invisible clips. Failing to pre-drill can cause irreversible damage to your terrace planks and ultimately diminish the integrity of your structure.
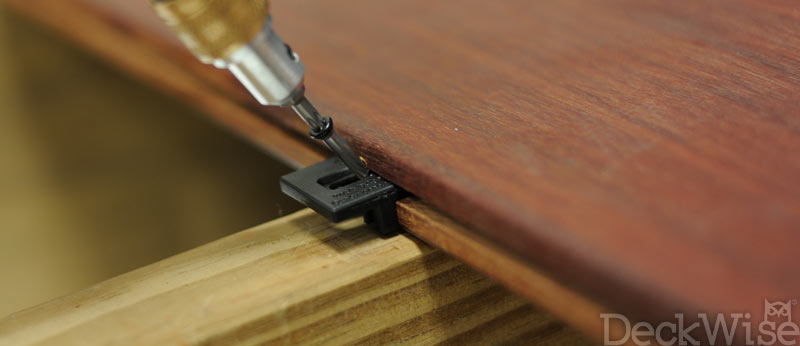
When securing any specie of imported terrace timber, we suggest using DeckWise® EXTREME® invisible hardwood clips. Our invisible terrace fixing produces a smooth, safe surface absent of face screw blemishes and flaws. Our unique system enables hardwood planks to expand and contract without overly stressing the timber plank. The embedded stainless steel insert is patented in the USA and adds 3X the strength than other imitation brands.
Taking the invisible fixing route rather than face screwing, not only helps prevent water from penetrating the timber fibers, but also keeps the surface splinter free. Click here if you need help installing DeckWise® our Invisible Hardwood Terrace Clips.
Finishing Hardwood Terrace Surfaces
Due to the extreme density and alkaline qualities of imported hardwoods, many oil and water based timber finishes on the market will not dry properly when applied. It is highly recommended that you test multiple sample planks with your preferred oil finish brand. Do this before applying to any new or restored terrace planks. DeckWise® highly advises to oil all hardwood terrace surfaces with a tinted clear (water-based) oil finish. Clean and reapply the oil finish two times per year (depending on local climate) to ensure the natural beauty of your hardwood is preserved.
Without applying a coat of a natural oil finish, your hardwood terrace will weather and become a silvery gray color in resemblance to Teak. Finishing your terrace surface will help ensure that it will maintain its stability as well as retain natural oils. If your terrace resides in a low ventilation area, we recommend applying an oil finish to all four sides of the timber planks shortly after acclimation, but before installation.
Installing & Gluing Wooden Plugs
If you choose not to use an invisible terrace clip, drilling and countersinking screw holes to hide screws is the best practice. We suggest a high quality glue such as a waterproof adhesive (Gorilla Glue®) that can offer sufficient results when inserting hardwood plugs into timber planks. Epoxy based resins and glues are also highly acceptable and can be pigmented to match various timber plank specie. Epoxy bonds are extremely strong and waterproof.They also work perfectly to apply on hardwood post caps.
What Fixing Clip Profile Should You Use?
Standard & Pre-grooved Timber Planks
For classic outdoor and uncovered terraces.
Standard and pre-grooved timber planks are each an appropriate option for both outdoor terraces and docks. For Standard timber planks without a slot, the side grooves and/or slots will need to be cut on the job site for installation of invisible fixings. Pre-grooved planks from a local timber yard may cost more, however they offer a much faster installation process. The DeckWise® EXTREME® line of invisible terrace clips are secured with timber screws inside the slot or groove on the plank edge, on one side only. This allows the opposing plank side the ability to expand and contract freely, preserving the proper spacing between planks.
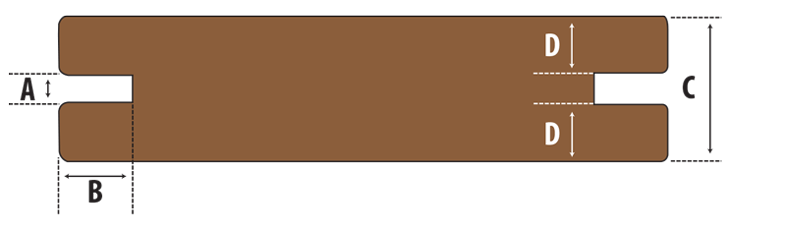
- A = 4mm
- B = 13mm
- C = Measurement of the plank thickness being installed.
- D = (C-A)/2 Note : This will center the continuous groove in the plank.
19mm x 140mm Example
Let’s say you are installing 19mm x 140mm timber planks, that would mean that:
- C = 19mm
- D = (19mm - 4 mm)
- D = (15mm)/2
- D = 7,5mm
21mm x 140mm Example
Let’s say you are installing 21mm x 140mm timber planks, that would mean that:
- C = 21mm
- D = (21mm - 4 mm)
- D = (17mm)/2
- D = 8,5mm
Plank Slots & Grooves
The DeckWise® EXTREME® line of invisible clips can utilize both standard non- grooved timber planks and pre-grooved planks. Simply use a router and multi-wing cutting bit to cut slots above sleeper joists on the job site to install our fixing clips as you go along. Biscuit jointers are also a preferred method to cut slots above each joist. Again, planks without slots or grooves in the sides will need to have them cut prior to installing invisible terrace fixing clips.
Positioning Terrace Grooves
Symmetrical groove profile allows planks to be reversed and/or flipped to put the best side up.
Cutting Plank Slots & Grooves
Many timber yards now offer pre-grooved planks in stock. You may also cut the slot or groove yourself using a standard biscuit joiner or router with a 4mm slot cutter.
Our Advised Terrace Installation Method
The DeckWise® Method
The DeckWise® EXTREME® clip is a high strength polymer "biscuit style" terrace clip. Its square design allows it to fit inside the plank slot with the most surface area possible. When there is more of the clip surface in contact with the inside of the plank slot, there is maximum strength and hold down power. Additionally, because we require a stainless steel screw to secure the terrace clip to the plank, there will not be corrosion problems.
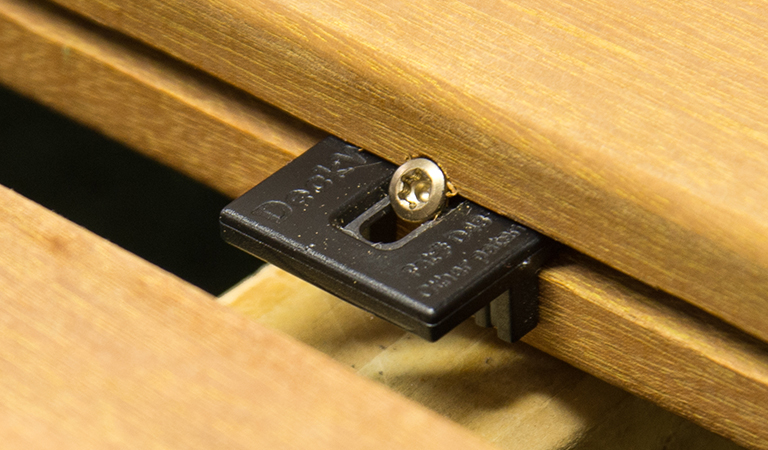
This fixing screw is inserted at a 45 degree angle, which again adds more hold down strength to the installation method. Furthermore, the threads of the timber screw bite fiercely into the timber fibers at an angle. The threads grip many more timber fibers than a screw screwed straight down.
Clip Install GuideOther Methods
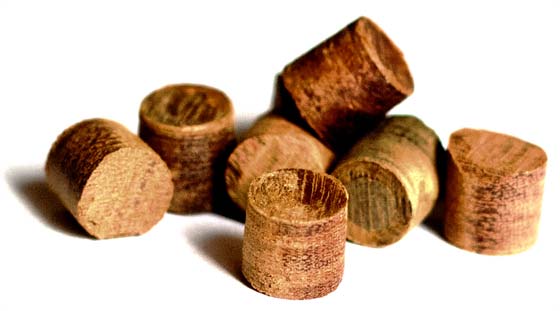
Face Screw & Timber Plug Method: Begin by drilling two (2) pilot screw holes over each continuous sleeper joist 3,2mm deep through the face of the terrace plank. Next, drill a countersink hole 9,5mm deep into each pilot hole. Secure the plank to the joist with stainless steel screws. Use the DeckWise® Drill & Drive™ drill bit set for quick drilling and countersinking. To finish the screw installation, insert a 3,2mm hardwood plug over the screw inside the hole. Remove any protruding top portion of the Ipe hardwood plug with a hand saw or sand flush and smooth. Move to the next joist and repeat the process.
DeckWise® offers Ipe Hardwood Plugs in each fixing kit and in the Complete Hardwood Plug Kit. Call for availability on different timber species such as Cumaru, Tigerwood, Garapa, and Massaranduba.
Hardwood PlugsSurface Face Screw Method: Face screw the timber planks using 4mm stainless steel screws (2 per sleeper joist). Trim-head screws are especially small and are not extremely noticeable. A small countersink cut will need to be made on each screw hole to allow the screw head to rest below the plank surface slightly to provide a smooth surface.
Tongue & Groove Terrace Planks: For use specifically on on covered terrace flooring only. Tongue & Groove terraces can be compared to interior hardwood floors by the fact that, it does not have any gap spacing between planks. Building an uncovered terrace using tongue and groove timber could cause many problems such as enabling excessive water to gather and influence the material to swell, disfigure, and buckle.
IMPORTANT NOTICE
Before designing your project, it is critical that you contact your local building authorities. You must determine how and what you may build, and receive permission in accordance to regulations in your area. You are fully responsible for acquiring any and all mandatory permits required for your project. Information found on this page acts only as advice and suggestions. We will NOT be held accountable for your project viability or should you choose not to obtain necessary permits, or if you fail to comply with all zoning ordinances and building codes specific to your local region and country.